
I love baking bread.
It’s strange because I started with baking cookies, then cakes and somehow, I found my way to bread. Baking bread is different from cakes and cookies. Cookies are pretty easy to get a hang of and cakes can be pretty complicated.
For me, bread fall into that spot that’s just right- not too difficult and yet, could be a handful. Anyone who’s baked bread without a bread maker will tell you that bread is simple – after all, there are only three basic ingredients: water, yeast, and flour. Yet, bread can be difficult too. Kneading is a complicated skill (which I’ve yet to master) which greatly affects the bread and you still have to contend with shaping and scoring.
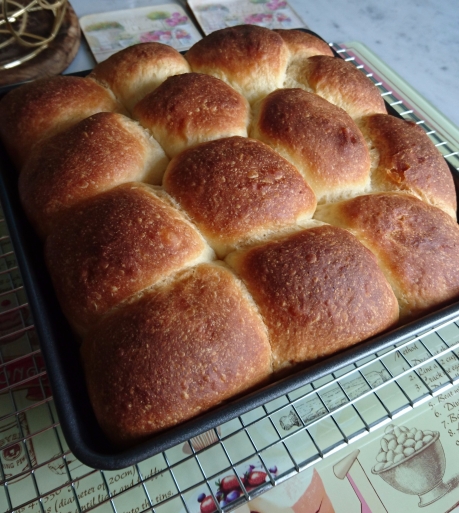
Anyway, without further ado, here are my bread rolls. They are soft, fluffy, and go so well with butter and kaya. The recipe is modified (just slightly!) from Christopher Tan’s Dinner Rolls recipe in his book, Nerd Baker. I’ve tried Christopher’s recipe but that requires a potato. I used tangzhong roux in place of the potato and it turned out just fine. The other modification is that I kneaded my dough by hand and to prevent issues when working with the sticky dough, I used olive oil to oil my hands.
Keep rollin’, rollin’, rollin’
Recipe for bread rolls (makes 14)
Ingredients:
– Bread flour (500g)
– Water (230g)
– Two eggs
– Caster sugar (75g)
– Milk powder (30g)
– Salt (1 tsp)
– Instant Yeast (2 tsp)
– Unsalted butter, cubed (50g)
Steps:
1. Make a tangzhong paste/roux* using 25g of flour and 125g of water. When roux is done and cooled to room temperature, add to remaining water (105g) in a large bowl.
2. Separate the egg whites and yolks. Retain the whites in a separate bowl. To the yolks, add the caster sugar, milk powder, and salt. Whisk yolks, caster sugar, milk powder, salt, followed by the egg whites, and add to the water from step 1.
3. Whisk everything in step 2.
4. Add yeast to the remaining flour and add flour to the already whisked liquids. Stir with a wooden spatula or by hand to form a shaggy dough. Cover bowl with a damp cloth and leave to rest for at least 30mins.**
5. Knead dough.***
6. Add butter to dough and knead until it smooth and not oily. Transfer dough to well-oiled bowl and cover with damp cloth for 1 hour.
7. Once the dough has doubled in size, pop it out of the bowl onto a well-oiled work surface. Divide the dough into 65-70g pieces. Round each piece and place on a baking sheet. Cover with a damp cloth and let dough balls rest for 10mins.
8. Take each piece in your well-oiled hands, flatten the dough slightly and fold inwards to the center of each dough, “squeezing” each ball lightly between your thumb and index finger in order to get a ball-shape (see Dr Leslie Tay’s wonderful video on doing this step). Place ball in a square-cake tin. Once all balls are in the tin, cover with an overturned bowl. Cover for 30mins or doubled in size. Melt some butter and preheat oven to 180 degrees celsius.
9. Pop in oven for 25-30mins.
10. Once done, transfer buns in tin to a wire rack to let it cool. Serve while still warm or cut each bun in two, pop it in the toaster for 5-7mins and enjoy with lots of butter.
Notes:
*Basically, the roux is made by cooking flour and water to 65 degrees celsius. This uses 5% of the flour required in the recipe and five times that flour’s weight in water. For this recipe, to make the tangzhong roux, add 125g of water to 25g of flour in a microwavable bowl/cup. Microwave on high for 25 seconds, stir contents, microwave mixture again for another 15 seconds. Stir mixture and repeat microwaving at 10-seconds intervals until you get a gooey paste. I only needed one 25sec, one 15sec and one 10sec round of microwaving in order to get the roux.
**This process is known as autolyse where the dough starts to form glutens and develop flavour. I’ve read of bakers who leave the dough to autolyse for 2 hours or more but I haven’t tried it with this dough. My gut feel is that there’s no need to because it’s not meant to be a heavy tasting bread like a sourdough.
***I kneaded the dough by hand, in the bowl. Basically I used the Rubaud Method (as seen here). The dough won’t be as wet as the one in the video but it’s still very sticky and takes some getting used to. Be sure to knead for maybe 5-10mins and then rest 5mins in between. You won’t need more than 15-20mins of this.
